Initial Steps
The RUM units will be in different locations depending on the pedestal manufacturer and installer, while we cannot guarantee identical installations between different installers we can give general guidance to the most likely locations. (common locations for RUM installations are in red) Information on how to open a pedestal can be sourced from the pedestal manufacturer.
Marina Electrical Equipment – Harbor light SS

Marina Electrical Equipment - Bayside

Eaton - Hatteras Light Power Pedestal

Eaton - Newport Harbor Mate Utility Center

Eaton - Lighthouse Power Pedestal

Eaton - Lighthouse-SS Power Pedestal

1. Confirm the Serial Number on the device matches what is on the Portal.

The Serial number is found on the thin 2-inch-wide stickers included with the RUM unit. The number will be preset after “ID#” and is 5 digits long. The Serial Number will also be present on the inside of the RUM unit in the red box shown.
Once this Serial Number has been found, ensure the serial number on the portal matches. This serial number can be found by following the below steps:
1. Go to the location where the space/slip is located
2. Click on the row of the space/slip in question
3. The Serial Number will be found at the lower left of the metering popup.
If the RUM unit is not Communicating
- Ensure the RUM unit is powered by the DC power supply
Pins 5 and 6 are the Power and Ground pins respectively. By taking a multimeter (set to DC voltage) to these two pins you can see whether the RUM unit is powered or not, the proper voltage is 12-24VDC.
If there is no DC voltage then check the AC voltage applied to the DC Power Supply, the power supply should be connected to a line and a neutral providing ~120VAC. If there is no AC voltage the there is likely a loose line wire or a faulty Circuit Breaker, an electrician may be needed to further diagnose any power issues.
- If the RUM unit is powered and not communicating inspect the indicator LED
A BLUE LED means the RUM unit is connected and communicating with a Merlin system, if this light is present and the device is still not checking in on the Marinesync Portal Marinesync recommends restarting the RUM unit, this will make the unit reinitialize its network settings and rejoin the network, this can resolve many communication issues. When restarting the RUM unit ensure the LED stops blinking red for at least 30 seconds.
A GREEN LED means the RUM unit is searching for a Base Station to connect to and has not yet found one. Check to ensure the Base Station antenna is securely attached as well as the RUM unit’s antenna is secure. A power cycle of the RUM unit may be required.
A RED LED is typically shown when the device is powering down. If this color is seen when the unit should be powered there is likely a power issue or short circuit that needs to be addressed. Remove all connections to the RUM unit other than power (pins 5 and 6), if the issue is resolved then slowly add connections back to the RUM unit to deduce where the problem connection is.
If the problem is not resolved contact Marinesync for further troubleshooting.
If the RUM unit is not reporting usage (or reporting incorrect usage)
- Ensure the Meter's ISO ouput (recommended) or the counter output is connected to the RUM unit
The RUM unit has 4 inputs that can be used for metering applications. These inputs are labeled “Meter Input” and further labeled 1-4. The meter outputs will have two wires, one of these wires will be the Signal+ which will go to one of the inputs, the other wire will be ground or Signal- which will connect to a ground pin on the RUM unit, these pins are labeled “COM”. Note which input is being used as this is VITAL information for ensuring that the Marinesync portal is setup properly. We recommend using a multimeter in continuity mode to ensure there is a solid connection between the Meter and the RUM unit. - Ensure the Meter is powered on with the proper reference voltage
All electric meters require power and a reference voltage to measure power usage. For instance: a 240V meter requires an L1 and L2 reference voltages and a neutral. A photo of an EZ-Meter AC wiring is here for reference.
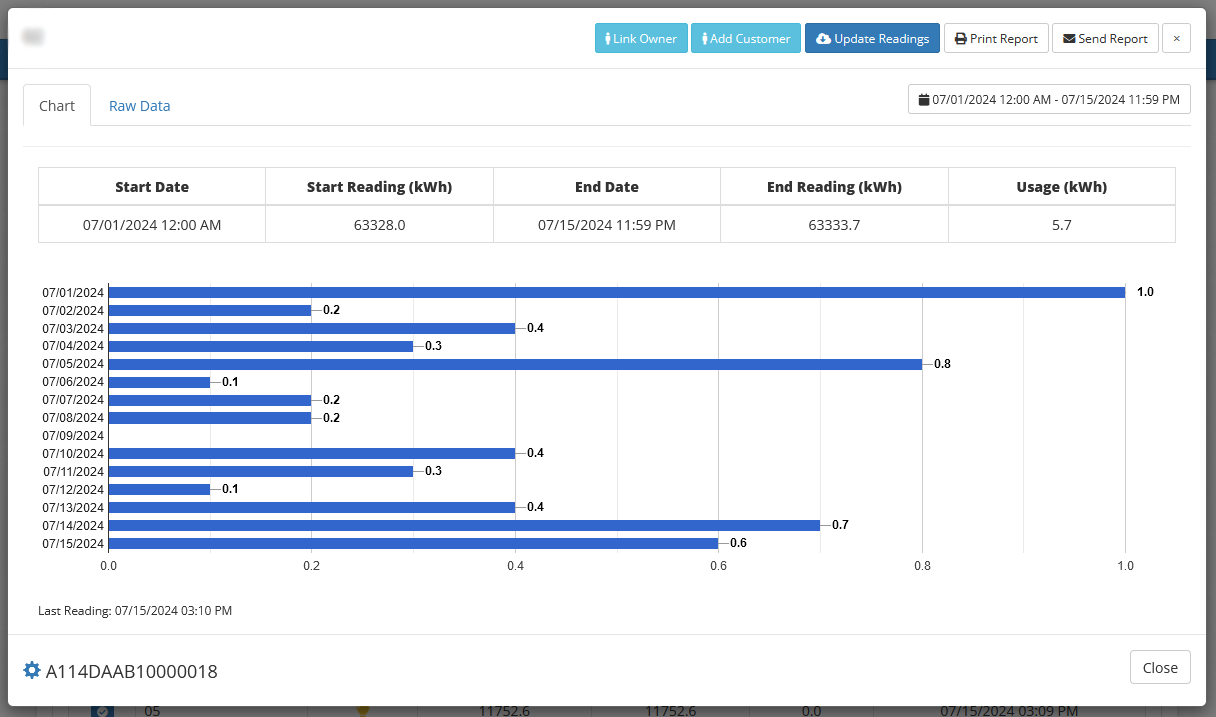
Most meters have a “power” LED that will light to let you know that the meter is powered properly. If the wiring is done properly but the LED is still not lit the voltage should be checked with a multimeter (in AC Voltage Mode). If the AC voltage is not correct or zero then there is likely a loose wire or a short in the run to the pedestal, an electrician will likely be required to further diagnose that issue. If the meter is powered and wired properly then move on to the next step. - Ensure the Meter Resolution matches the Resolution on the Marinesync portal
The electric meter resolution is often 0.01 KW, 0.1 KW, or 1 KW per pulse. This means that for every X KW used the meter sends out a single pulse. The resolution set on the Marinesync portal must match the meter resolution for the correct usage to be reported on the portal. The resolution on the portal can be seen by the precision of the reading shown on the site. For instance, the resolution of the portal image shown above is 0.1 KW as the reading is precise to 0.1. - Run a Load on the Meter to Test the Install
Using a Load Generator such as a Resistive Bank, or a Heat Gun; draw a relatively known load (i.e. 1 KW) and ensure the Marinesync portal shows 1 KW of usage. One way to know the power being drawn is to watch the meter as the load is applied, most meters have an indicator light which blinks every 0.01 KW. The power draw that causes the light to blink is different from meter to meter, so be sure to check this as it’s often listed on the meter. Check the Marinesync portal and update the RUM units reading to ensure that it is seeing the pulses.
If the portal is still not recording the pulses properly after following these steps, contact Marinesync for further troubleshooting. Here is the needed info for Marinesync to accurately diagnose the issue:
- The Serial number of the RUM unit
- The inputs of the RUM unit used
- The Brand of Electrical Meter
- The resolution of the Meter
- The Serial Number of the Meter
Was this article helpful?
That’s Great!
Thank you for your feedback
Sorry! We couldn't be helpful
Thank you for your feedback
Feedback sent
We appreciate your effort and will try to fix the article